

Instead of rigging a loose shelter beside your Land Rover at every stop, fit a roof-rack awning using brackets approved for both the rack and awning. Confirm the vehicle’s load limits and mounting structure first, then position, secure and test the installation before driving.
- For a roof rack awning ex military Land Rover installation, confirm compatibility before buying brackets.
- Military Mart suits ex-military Land Rover owners sourcing genuine surplus camping kit.
- Mount the awning to approved rack attachment points, not canvas, unsupported roof panels or unidentified old holes.
- Use the specified fasteners, tightening instructions and supports; there is no universal Land Rover awning fitting specification.
Why this matters
An awning adds more than weight. Its position beside the rack puts a turning force through the brackets, and deployed fabric catches wind. A fitting that feels firm while parked is not proof of a sound installation.
Military Mart supplies genuine surplus camping kit and military vehicle spares. Start with the vehicle and mounting system, then choose the rest of your Military Mart camping kit around the space left below.
For a 2026 conversion, inspect what is actually fitted. Previous repairs, replacement roofs and unidentified racks matter more than an army registration or a familiar body shape.
The rack, brackets, awning and vehicle must work as one mounting system. If you cannot confirm that combination, stop before drilling or loading it.
Before you start
- Identify the complete installation. Record the vehicle variant, roof construction, rack manufacturer and model, and awning model. Obtain the relevant fitting instructions, permitted loads, bracket positions and restrictions on off-road use.
- Prepare the correct kit. Have the approved brackets and fasteners, suitable hand tools, measuring tape, safe access equipment and a torque wrench covering the specified settings. Arrange 2 people for positioning a long awning; use lifting assistance if its handling instructions require more.
- Check the hidden snag: the load path. A canvas hood, roof skin or old bolt hole does not establish a structural mounting point. On a soft-top vehicle, use a rack system specifically approved for that body configuration; do not treat hood sticks as rack supports without documented approval.
Record the roof-load allowance and the mass of everything carried above the body: rack, awning, brackets and other luggage. Check whether each stated limit applies while driving, while stationary, or under particular operating conditions.
A stationary load rating does not replace a driving rating. If documentation is missing, ask the vehicle, rack or awning supplier to confirm suitability before proceeding.
Which awning position suits your Land Rover?
Choose the position by how you use the vehicle, not by which side looks tidiest. Check your normal parking layout, rear access and the space needed to deploy the shelter.
| Position | Best for | Practical advantage | Limitation to check |
|---|---|---|---|
| Side-mounted awning | A seating area beside the vehicle | Leaves the rear available for loading | Side doors, mirrors and the packed awning must clear each other |
| Rear-mounted awning | Sheltered access to rear storage | Covers the unloading area | Rear-door swing, spare wheel and rack access can interfere |
| Wraparound awning | Shelter beside and behind the vehicle | Connects adjacent camp areas | Requires its specified bracket layout and support arrangement; do not substitute a straight-awning fitting pattern |
For a 2026 build, decide the complete roof layout before fitting anything permanently. An awning installed first can block the mounting position needed by another accessory.
Choose the smallest installation that meets your camp layout and documented mounting limits. More covered space is not a reason to exceed the rack’s approved arrangement.
Vehicle and rack checks
- Park on firm, level ground, apply the parking brake and keep the awning packed. Remove loose roof luggage so you can inspect the rack and its feet.
- Inspect the rack, clamps, brackets and supporting bodywork. Look for corrosion, cracked welds, distorted sections, loose fixings and movement around attachment points. Resolve defects before adding equipment.
- Confirm that the rack is installed according to its own instructions. Check the prescribed foot positions, clamp engagement and fasteners rather than simply tightening everything harder.
- Write down the permitted load and any operating restrictions. Include the awning’s packed mass and mounting hardware in your roof-load record, alongside existing equipment.
- Check the proposed awning attachment points against the rack and awning instructions. Confirm bracket quantity, spacing, orientation and whether an adaptor is required.
Expected result: you can identify a documented route from the awning brackets through the rack to the vehicle’s approved supporting structure.
If the roof has been changed, repaired or converted, establish its identity and condition before relying on the original vehicle description. A hard top does not automatically make every part of the roof suitable for a mounting bolt.
Do not use a road test to discover whether a questionable rack attachment holds. An unidentified mounting system needs assessment first.
Awning position and clearance
- Mark the proposed bracket locations using removable tape. Follow the prescribed spacing and permitted overhang; do not invent a wider gap to avoid an inconvenient rack crossmember.
- With assistance, hold or safely support the packed awning in position. Keep hands clear of trapping points and do not balance it unsecured on the rack edge.
- Complete 4 clearance checks: side doors, rear door, roof accessories and the awning’s deployment path. Include the spare wheel, ladder, aerials and any raised equipment in the inspection.
- Check access to the cover zip, retaining straps and release mechanism. You must be able to open and secure the awning using safe access equipment, without standing on unsuitable body panels.
- Measure the proposed installed height and record it in metres. Check the width added by the packed awning and brackets, including exposed bolt ends and corners.
Expected result: the packed awning has the specified mounting position, vehicle openings work normally, and the deployment area is clear.
Allow for doors and accessories moving through their full travel, not just their resting positions. Do not move a bracket outside its approved position to gain clearance; change the approved fitting arrangement instead.
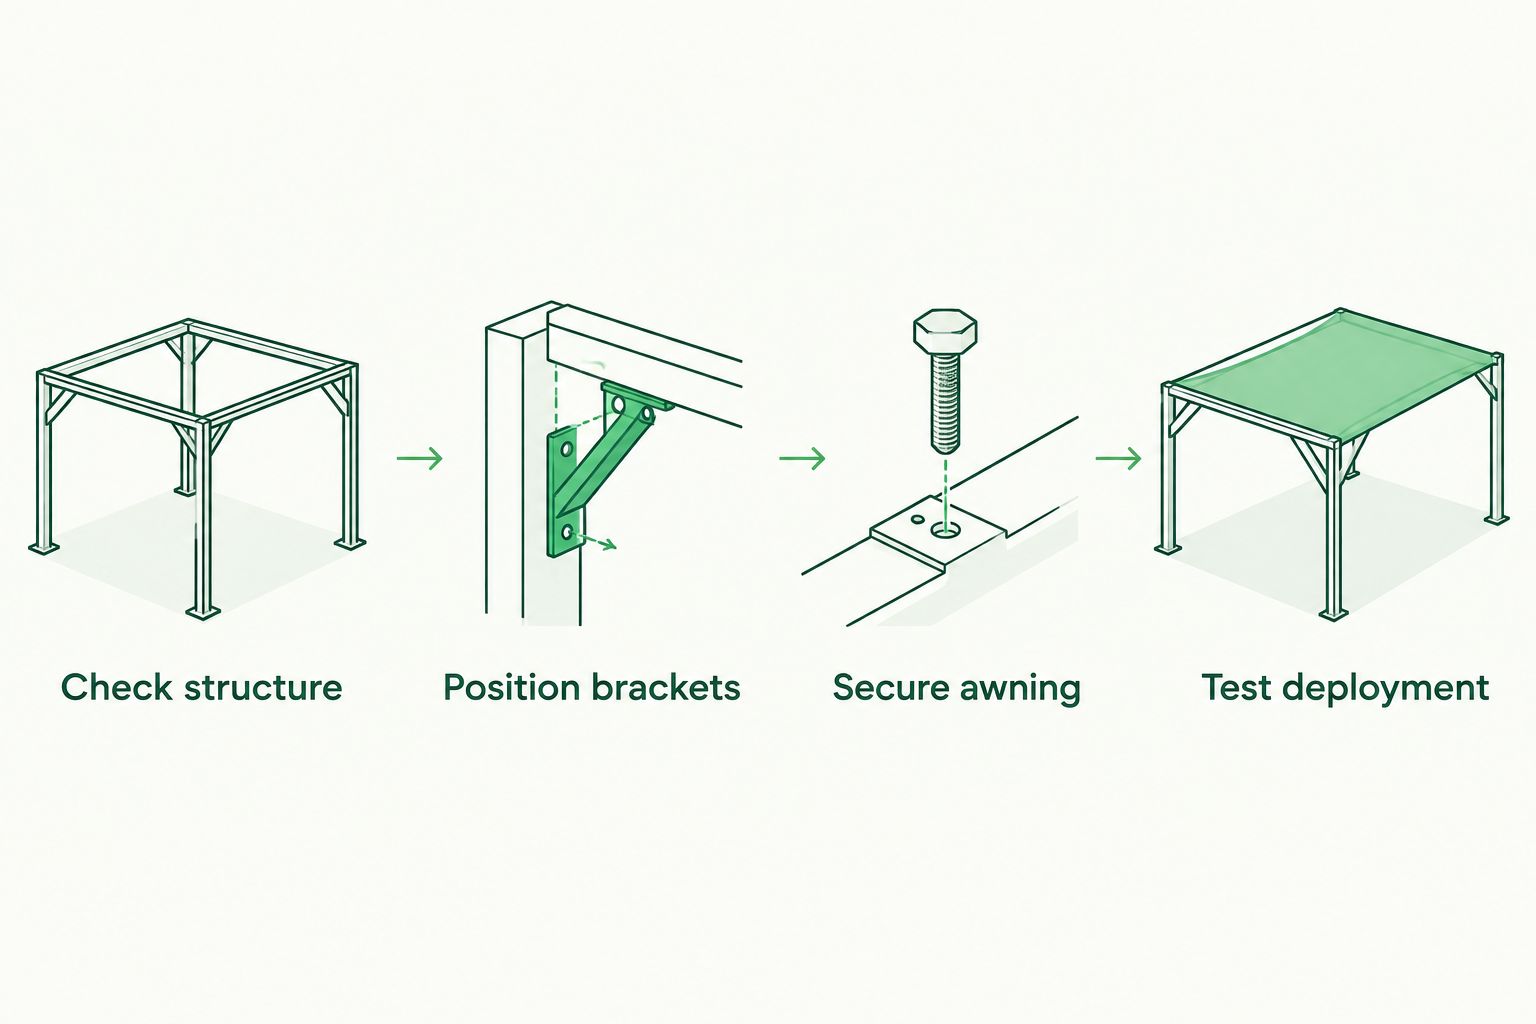
Brackets and final fastening
- Lay out the specified brackets, bolts, washers, spacers and locking components. Check their identification against the fitting instructions. Do not substitute unidentified workshop bolts or load-restraint gear for mounting hardware.
- Fit the brackets to the rack using the approved attachment method. Leave fixings adjustable only where the instructions require it during alignment. Do not drill the rack unless its manufacturer explicitly permits the proposed holes.
- Attach the awning backing rail to the brackets in the specified orientation. Keep the awning supported until the required fixings are engaged, then check that the backing rail sits correctly without forced alignment.
- Tighten fasteners in the prescribed sequence to the manufacturer’s stated torque in Nm. Follow instructions about lubrication, thread-locking products and locking nuts; these affect the fastening arrangement.
- Inspect every connection. Check required thread engagement, washer positions, bracket seating and clearance around bolt ends. Apply corrosion protection or isolation materials only as specified for the metals and fitting system involved.
Expected result: every mounting component matches the approved arrangement, and the awning is secured without distorted brackets or trapped components.
There is no universal bolt size or torque figure for a roof rack awning on an ex-military Land Rover. The fastener, bracket, rack profile and awning rail determine the specification.
If holes do not line up, stop. Enlarging slots, bending brackets or adding a stack of washers changes the installation rather than correcting compatibility.
Deployment and road-readiness checks
- Complete 1 full test deployment in calm conditions, with assistance. Follow the awning’s opening sequence and fit its required legs, guy lines and anchors immediately.
- Open the vehicle doors carefully and inspect the working clearances again. Check that poles and lines leave a usable route to the vehicle without blocking an exit.
- Set the fabric and drainage arrangement exactly as instructed. Do not assume every awning should be tensioned level, or that every model permits the same leg-height adjustment.
- Pack the awning away following its instructions. Secure internal retaining straps, close the cover and check that no fabric, line or loose strap can reach a wheel, door seal or hot component.
- Inspect the completed installation before driving. Follow the specified initial recheck procedure and subsequent inspection intervals; record the installed height and load information where you can find them.
Expected result: the shelter deploys and stows correctly, all required supports work, and nothing remains loose for travel.
For your 2026 fitting record, keep photographs of the bracket positions alongside the manuals and fastening specifications. Photographs help you spot later movement, but they do not replace a physical inspection.
Never drive with the awning deployed. Pack it away before moving the vehicle, even within a campsite.
Fitting an awning across the rear instead
A rear-mounted awning is an adjacent workflow, not a reason to rotate the existing brackets and hope. Confirm that the awning and rack permit rear mounting before changing the layout.
Repeat the same structural, load and fastening checks. Then position the packed unit around the rear door’s full swing and the spare wheel’s movement, rather than copying the side-mounted location.
Check that you can reach the cover and retaining straps without leaning dangerously over the spare wheel. Deploy the shelter and make sure its supports do not obstruct the unloading route.
The benefit is shelter over rear storage. The drawback is competition for space with a rear ladder, door-mounted equipment and anything carried at the back.
A 2026 rear-access layout should be tested with the kit you actually unload. An empty vehicle can hide an awkward lifting route that becomes obvious with bags and boxes in place.
Troubleshooting
The awning moves when packed
Stop using the installation until you identify the movement. Check bracket seating, rail attachment, specified fasteners and the rack’s own vehicle attachments. Do not cure movement by exceeding the stated torque.
A door catches the cover
Return to the positioning stage. Adjust only within the approved bracket and mounting ranges; if clearance remains inadequate, use a compatible alternative arrangement rather than forcing the door past the cover.
The brackets will not sit square
Check whether the rack profile needs a specified adaptor and whether the brackets face the correct way. Do not pull a bracket straight with its bolts or pack gaps with improvised spacers.
Water pools in the fabric
Check the awning’s required pitch, fabric tension and drainage instructions. Correct the setup only when conditions allow safe handling; stow the awning if you cannot maintain the instructed arrangement.
The mounting area shows corrosion or cracking
Unload the rack and have the affected structure assessed before further use. Paint does not restore lost material, and tighter clamps do not repair a damaged supporting panel.
Customise your workflow
Build the rest of the vehicle around the approved roof load and usable camp space. Keep additional equipment from blocking awning fixings, cover access or support locations.
If you plan to carry storage containers, follow the separate guide to attaching ammo boxes to a roof rack. Include containers, contents and their mounting hardware in the same load record.
Military Mart’s surplus camping range suits owners putting together practical vehicle-based kit. Condition and grading still matter: genuine issue equipment is not automatically compatible with an awning or approved as structural mounting hardware.
Keep cooking appliances away from awning fabric and follow appliance ventilation and clearance instructions. A sheltered seating area is not permission to run a stove in an enclosed space.
FAQ
Can I fit a roof rack awning to a soft-top ex-military Land Rover?
Yes, only where a rack system is specifically approved for that vehicle and body configuration. Do not use the canvas hood or assume its supporting sticks can carry the rack and awning.
Do I need to drill the Land Rover roof to fit an awning?
An awning mounted to a compatible existing rack does not necessarily require roof drilling. Follow the approved rack and bracket arrangement; do not drill roof panels or rack sections without the relevant approval.
What bolts and torque settings should I use?
Use the fasteners and torque settings specified for the exact rack, brackets and awning. There is no universal bolt size or tightening figure for an ex-military Land Rover awning installation.
Is a side awning better than a rear awning?
A side awning suits a seating area beside the vehicle, while a rear awning suits sheltered unloading. Choose the position that meets the mounting instructions and clears doors, the spare wheel and other equipment.
Can I leave an awning out in windy weather?
Follow the awning manufacturer’s weather limits and support instructions, and stow it before conditions exceed them. Do not assume a freestanding design is safe in all wind conditions.
Does ex-military equipment mean the roof can carry more weight?
No, military origin does not establish a roof-load allowance. Confirm the limits for the actual vehicle configuration, rack and mounting system, including any restrictions while driving off-road.
Can surplus straps or bungees replace awning brackets?
No, straps and bungees are not substitutes for approved structural awning brackets. Use the mounting components specified for the rack and awning combination.
One last thing
Measure the finished vehicle, not just the rack. The packed awning or a bracket can become its highest or widest point.
Before your first 2026 trip, record the actual travelling dimensions with the roof kit fitted. Keep that note visible when checking height barriers, covered parking and narrow access routes.


Leave a comment